
HOW TO MAKE PAPER GIFT BAGS
First, get a sheet of paper and for our case, we’ll use the dimensions 80cm by 30cm.
You can use any type of paper sheet of any color or design but considering the tensile strength of the paper material that would hold up the load.
Stretch out the width to about 30 cm folded by both sides together leaving out 20cm.
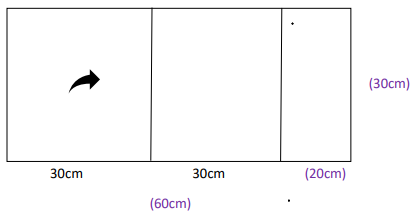
After folding the two 30cm parts together you fold back the remaining 20cm gluing the edges of the contact parts making it a full circle, let the glue dry it out for a minute. After it has dried with the width at the bottom make a fold of 10cm which will act as the base of the bag as illustrated below.
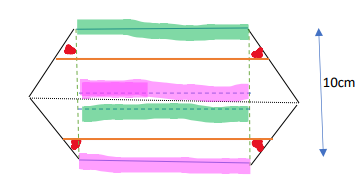
After making the 10cm fold you spread out and at the edges of the end meeting points in that you form an equilateral triangle as shown above then as shown in the illustration draw about a centimeter and make a fold from the opposite end as shown above. The green edge will be folded to the green on the inner part, as well as the pink part. The orange lines form the foldable edges, the red points show where to apply the glue and the outer colored edges are where you apply the glue too, in that when you fold they overlap and glue each other to the points forming a flat base, then you let it dry for a few minutes. After drying fold on the green dotted lines to Create the GussetsIf you want your bag to have a flat bottom and sides (like a grocery bag), fold each side of the paper inward towards the center, overlapping them slightly. This will create gussets. Crease the folds well and Voila! Your Gift Bag Should be ready.
Please check out our video release below!